Source to Image流程为应用的容器化提供了一个标准,实现了自动化。OpenShift默认提供Java WildFly、PHP、Python、Ruby及Perl 的S2I Builder镜像。但是现实中的需求五花八门,特殊的应用构建环境需要用户定制S2I的Builder Image来满足。
S2I Builder镜像从本质上来说也是一个普通的Docker镜像,只是在镜像中会加入S2I流程需要的一些脚本和配置。下面将展示一个基础的 S2I Builder镜像的定制过程。
一、准备环境
1、下载s2i二进制执行文件(文件版本及地址:https://github.com/openshift/source-to-image/releases
tar -zxf source-to-image-v1.1.8-e3140d01-linux-amd64.tar.gz -C /usr/bin/
2、通过s2i create命令创建一个名为tomcat-s2i的S2I Builder镜像。第三个参数tomcat-s2i-tmp定义了工作目录的名称。
s2i create tomcat-s2i tomcat-s2i-tmp
cd tomcat-s2i-tmp,会看到Dockerfile、Makefile、s2i等文件
3、s2i文件

1)assemble:负责源代码的编译、构建及构建产出物的部署。
2)run:S2I流程生成的最终镜像将以这个脚本作为容器的启动命令。
3)usage:打印帮助信息。一般作为S2I Builder镜像的启动命令。
4)save-artifacts:为了实现增量构建,在构建的过程中会执行此脚本保存中间构建产物。此脚本并不是必需的。
二、编写Dockerfile
Dockerfile

# tomcat-s2i
FROM maven:3.3-jdk-7
LABEL io.openshift.s2i.scripts-url=image:///usr/libexec/s2i io.k8s.description="Tomcat S2I Builder" io.k8s.display-name="tomcat s2i builder 1.0" io.openshift.expose-services="8080:
http" io.openshift.tags="builder, tomcat"
WORKDIR /opt
ADD ./apache-tomcat-8.5.5.tar.gz /opt
RUN useradd -m tomcat -u 1001 && \
chmod -R a+rw /opt
RUN chmod a+rwx /opt/apache-tomcat-8.5.5/*
RUN chmod +x /opt/apache-tomcat-8.5.5/bin/*.sh && \
rm -rf /opt/apache-tomcat-8.5.5/webapps/*
COPY ./s2i/bin/ /usr/libexec/s2i
USER 1001
EXPOSE 8080
ENTRYPOINT []
CMD ["usage"]

三、编写s2i脚本
s2i/bin/assemble

#!/bin/bash -e
#
# S2I assemble script for the 'tomcat-s2i' image.
# The 'assemble' script builds your application source so that it is ready to run.
#
# For more information refer to the documentation:
#
# If the 'tomcat-s2i' assemble script is executed with the '-h' flag, print the usage.
if [[ "$1" == "-h" ]]; then
exec /usr/libexec/s2i/usage
fi
# Restore artifacts from the previous build (if they exist).
#
if [ "$(ls /tmp/artifacts/ 2>/dev/null)" ]; then
echo "---> Restoring build artifacts..."
mv /tmp/artifacts/. ./
fi
echo "---> Installing application source..."
cp -Rf /tmp/src/. ./
mvn -D maven.test.skip=true package
find . -type f -name '*.war'|xargs -i cp {} /opt/apache-tomcat-8.5.5/webapps/
mvn clean
echo "---> Building application from source..."
# TODO: Add build steps for your application, eg npm install, bundle install, pip install, etc.

s2i/bin/run

#!/bin/bash -e
#
# S2I run script for the 'tomcat-s2i' image.
# The run script executes the server that runs your application.
#
# For more information see the documentation:
#
#exec asdf -p 8080
bash -c "/opt/apache-tomcat-8.5.5/bin/catalina.sh run"

四、执行镜像的构建
1、下载对应的tomcat(Dockerfile中使用的版本,也可以在Dockerfile中设置下载)。
cd /root/tomcat-s2i-tmp
make
执行成功后,docker images就可以看到tomcat-s2i镜像已经产生
2、构建成功完成后,可以通过s2i build <源代码地址> <构建输出镜像的名称>命令执行测试此S2I构建镜像。
s2i build https://github.com/nichochen/mybank-demo-maven tomcat-s2i test-app
3、测试镜像
docker run -itd -p 8080:8080 test-app
五、导入Openshift的docker的仓库,就可以在Openshift上形成一个Image Stream,就可以在Openshift上使用了
1、下载build镜像
2、上传到名为openshift的项目(可被其他项目共享模板)
oc import-image registry.intra.XXXXXXXXX.com/yqb/dxm-python-27:latest -n openshift --confirm --insecure=true
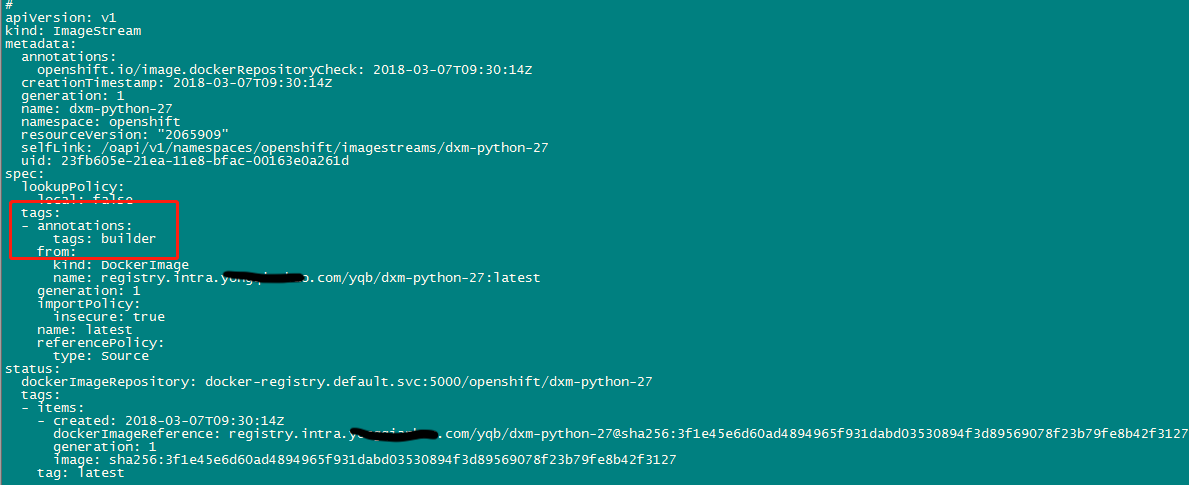
3、修改镜像,tags设为builder
oc edit imagestream dxm-python-27

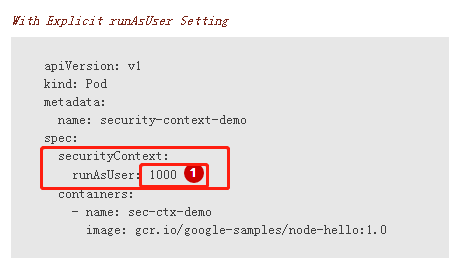
4、设置权限,使pod可以使用任何uid;也可以在模板里指定uid
oadm policy add-scc-to-group anyuid system:authenticated
OR: